React + Firestore : CRUD

One of the biggest barriers to learning React used to be the overwhelming amount of tooling involved. Beginners were forced to make important decisions about things they don’t understand before they could create anything.
React solved this problem in 2016 by releasing something called Create React App. Now there is an official way to create single-page React applications with zero configuration. If you chose to use create-react-app then you don’t have to make any other decisions.
I believe firebase is create-react-app for the backend. It lets you start building full-stack applications without having to get lost in a wormhole of build tools and server-side boilerplate. Using only Firebase and React you can build and deploy a full-stack project set up in a weekend.
To get setup please refer to React + Firestore : Get Setup In Five Steps.
Read From The Firestone
Lets manually add a datum in the firebase console so that we have something to read.
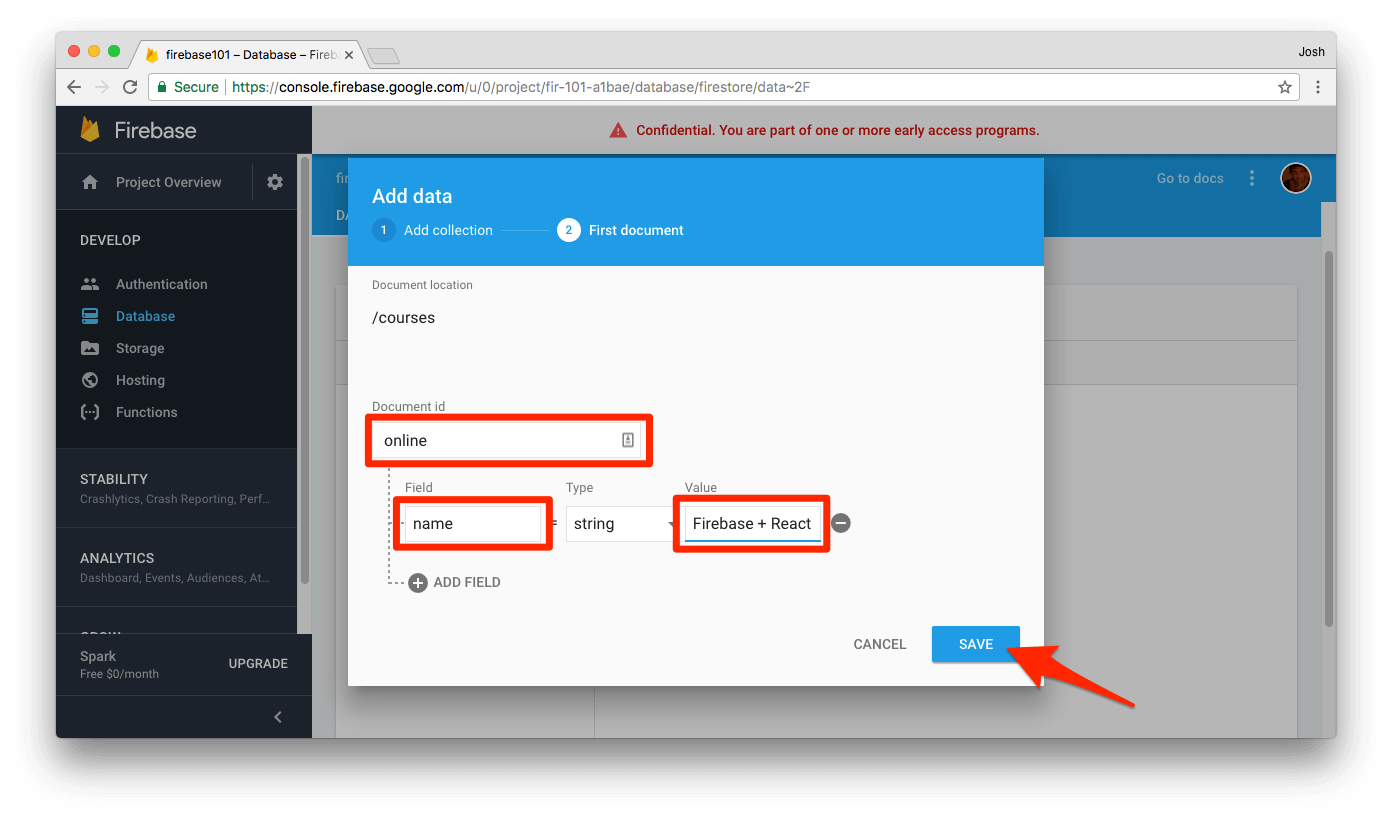
In the firebase console, click on Database in the left-hand panel, under DEVELOP (1). Make sure you are in the Cloud Firestore section (2) and under the Data Tab (3) and then click on ‘Create Collection’ (4).

Create a collection named ‘courses’

Then create a document named ‘online’ and give it a key of ‘name’ and a value of ‘Firebase + React’.
You can think of a collection as a group of items. In the Firestore, you can only create a collection at the root level. You cannot put a single item in the first column.
Items in the Firestore are called documents. You can store key-value pairs on a document in the same way that you would with a javascript object.
So far we have created a collection of ‘courses’, and added a document of ‘online’ to that collection. Then we gave our ‘online’ document a key of ‘name’ and set the name to ‘Firebase + React’.
To read this information from the Firestore, navigate to the App.js component in our source folder and import the Firestore database from the firebase.js file we created in React + Firestore : Get Setup In Five Steps.
import { db } from './firebase'
Create a ‘name’ property in state and set it to the content of the <h1> tag. Then replace the <h1> tag with {this.state.name}. Now that the title is stored in state we can change our state to update the title.
When the App component finishes mounting we want to pull the name of the tutorial from the database and store it in the name property on our state.
componentDidMount() {
 db
  .doc('courses/online')
  .get()
  .then(doc => this.setState({ name: doc.data().name }))
}
To reference the datum, we used the .doc method on teh db object we imported. This tells the Firestore the path to the document we want.
.doc('courses/online')
Then we use the get method to get the datum we want.
 .doc('courses/online')
 .get()
The get method takes a little while to get the datum so we add a promise to the end of it.
db
 .doc('courses/online')
 .get()
 .then(doc => this.setState({ name: doc.data().name }))
The promise will return a snapshot of the document, not just the piece of information we want. It is crucial that you add the .data() method to the returned document doc.data() to be able to access the information we want. Then we can specify that we just want the ‘name’ datum using the dot notation like we would with a javascript object.
If we refresh the App the title should now change to ‘Firebase + React’ when the component finishes mounting.
Congratulations! You now know how to read from the Firestore.
Write To The Firestore
Let’s create a form so that we can write to the Firestore from the browser instead of having to manually enter it in the firebase console.
<form onSubmit={e => this.handleSubmit(e)}>
  <input
      type="text"
      ref={input => {this.titleName = input}} />
  <button type="submit">Submit</button>
</form>
When the form submits we want the handleSubmit method to set the name of the title. We do this use the .set() method on the document we want in the Firestore.
handleProjectTitle = e => {
  e.preventDefault()
  db.doc('courses/online').set({name: this.textInput.value})
}
If you use .set() on a document path that doesn’t exist then it will create the document for you. For example, if we were to specify db.doc('courses/offline').set({name: this.textInput.value}) it would create the ‘offline’ document for your.
In our case, we are using .set() on a document that exists so it will just update it for us instead.
The .set() method can only create or update a single document. To add multiple documents to a collection we must use the .add() method.
Write Multiple Documents To The Firestore
Let’s change our submit handler to use the .add() method, so that when the form submits it creates a new collection and then pushes new items into the collection with each subsequent submit.
handleSubmit = e => {
 e.preventDefault()
 db.collection('suggestions').add({name: this.textInput.value})
}
Since the ‘suggestions’ collection doesn’t exist it will create it for us on the first submit.
Add some text to the form, click on the submit button and then navigate to the firebase console. You will see a new collection with a new document in the database.
Submit a couple more new entries and you will see multiple documents in the new collection.
Since we didn’t name each new document, the Firestore went ahead and names each one a unique jumble of letters and numbers for us.
Read Multiple Documents From The Firestore
If we want to display all our new documents in the browser we must take a different approach to the previous .get() example. Showing an entire collection means iterating over each document
db
 .collection('suggestions')
 .get()
 .then(collection => {
    const suggestions = collection.docs.map(doc => doc.data().name)
    this.setState({ suggestions })
 })
We map over each document in a collection and store the value of the ‘name’ property in that document in a constant. When everything is complete we copy out new constant to a property in state (of the same name ‘suggestions’)
Let’s replace the <p> tag in the App component with an unordered list that maps over the new array of ‘suggestions’ in our state.
<ul>
 {this.state.suggestions &&
   this.state.suggestions.map((topic, index) =>
     <li key={index}>{topic}</li>
    )
  }
</ul>
If you try adding a new suggestion in the form it will get saved to the database but you will have to refresh the browser before it shows up on the screen.
To make the updates automatic we can swap out the .get() method for a .onSnapshot() method and everything will update in real time without needing to refresh.
db.collection('suggestions').onSnapshot(collection => {
   const suggestions = coll.docs.map(doc => doc.data().name)
   this.setState({ suggestions })
})
Try adding another suggestion in the form and it will show up on the screen instantly.
Deleting a Document From The Firestore
Let’s add a delete button to each list item:
{this.state.students &&
  this.state.suggestions.map((topic, index) =>
    <li key={index}>
      {topic}
      <button>Delete Me</button>
    </li>
  )
}
Then we need to add an onclick handler to the button:
 <button onClick={ ( ) =>
    db
      .collection('suggestions')
      .doc( suggestion identifier )
      .delete( )}>
Delete Me
</button>
We can use the .delete( ) method on a document to delete it. The only problem is that we need to identify which document we want to delete. Since we used the .add() method to create the document, their identifiers were randomly generated out of a jumble of numbers and letters. We don’t know the name of the specific document we want to delete.
To fix this we need to go back and refactor the way we created the document so that we can store the unique identifier as another field in each document.
One way to do this is to create a document reference first, and then update that refrence with the data we want to store on the document. Our handleSubmit function on our form would become:
handleSubmit = e => {
e.preventDefault()
db.collection(‘suggestions’).add({name: this.textInput.value})
}
handleSubmit = e => {
  e.preventDefault()
  //step 1: create the reference
  const newSuggestionReference = db.collection('suggestions').doc()
  //step 2: update the reference with the data
  newSuggestionReference.set({
    name: this.textInput.value,
    id: newSuggestionReference.id })
}
Instead of using the .add() method to save everything in one go, we break the process into two steps. First, we create an empty document at the location we want db.collection('suggestions').doc() and we save the reference to it in a variable. Then we use teh .set() method to update the empty document with the data we want. We can access the randomly generated name of the new document by calling.id on the reference we created.
This slightly more complicated, two-step process allows us to store the name of each document in the document. This becomes useful when we want to do something to a specific document, like update or delete it.
{this.state.students &&
  this.state.suggestions.map((topic, index) =>
    <li key={index}>
      {topic.name}
      <button onClick={ ( ) =>
          db
            .collection('suggestions')
            .doc(topic.id)
            .delete( )} >
        Delete Me
      </button>
    </li>
  )
}
In the code block above we reploced topic on line 4 with topic.name and we replaced the suggestion identifier with topic.id.
The only problem is that topic.name and topic.id don’t exist yet because we are only retrieving the name field when the component finished mounting. Let’s change this to pull the entire document rather than just the name field.
componentDidMount() {
  ...
  db.collection('suggestions').onSnapshot(collection => {
     const suggestions = coll.docs.map(doc => doc.data())
     this.setState({ suggestions })
  })
}
If you add some text into the form and submit it now you can click on teh delete button beside the new list item and delete it. However, if you try and delete one of the list items we created earlier the delete button will throw an error.
This is because we don’t have an id field on the earlier created documents. to fix this lets only show the delete Button on items that have id fields.
{this.state.students &&
  this.state.suggestions.map((topic, index) =>
    <li key={index}>
      {topic.name}
      {topic.id && <button onClick={ ( ) =>
          db
            .collection('suggestions')
            .doc(topic.id)
            .delete( )} >
        Delete Me
      </button>}
    </li>
  )
}
By conditionally rendering the delete button we only let users delete items that can be deleted.
Congratulations, now you know how to read, write, update and delete data in realtime with the Cloud Firestore and React.