Setting Up Your First Eval with Typescript
One big barrier to testing prompts systematically is that writing evaluations usually requires a ton of setup and maintenance. Also, as a TypeScript engineer, there aren’t that many practical guides on the topic, as most of the literature out there is for Python developers.
I want to show you how write your first AI evaluation framework with as little setup as possible.
What you will need #
- LLM API key with a little credit on it (I use Gemini for this walkthrough).
Step 0 — Set up your project #
Let’s start with the most basic AI feature. A simple text completion feature that runs on the command line.
mkdir Summarizer
cd Summarizer
pnpm init
Install the AI SDK package, ai, along with other necessary dependencies.
pnpm i ai dotenv @types/node tsx typescript
Once you have the API key, create a .env file and save your API key:
GOOGLE_GENERATIVE_AI_API_KEY=your_api_key
Create an index.ts file in the root of your project and add the following code:
import { google } from "@ai-sdk/google";
import { generateText } from "ai";
import "dotenv/config";

export async function summarize(text: string): Promise<string> {
  const { text: summary } = await generateText({
    model: google("gemini-2.5-flash-lite"),
    prompt: `Summarise the following text concisely:\n\n${text}`,
  });
  return summary;
}

async function main() {
  const userInput = process.argv.slice(2);

  if (userInput.length === 0) {
    console.error('Usage: pnpm start "<text to summarize>"');
    process.exit(1);
  }

  const inputText = userInput.join(" ");
  console.log("Summarising...\n");

  try {
    const summary = await summarize(inputText);
    console.log("Summary:");
    console.log(summary);
  } catch (error) {
    console.error("Error:", error instanceof Error ? error.message : error);
    process.exit(1);
  }
}

main().catch(console.error);
Create a script to run the Summarizer in your package.json
"scripts": {
  "start": "tsx index.ts",
},
Now, run your script:
pnpm start "Hi team—We’re moving the launch from Feb 2 to Feb 9 due to QA delays. Please stop new feature merges after Jan 30. We need updated release notes by Feb 5. -Maya
And you should see the AI model’s response to your prompt.

Step 1 — Put your expectations down #
If we’re building a feature that summarises text, we need to outline (in plain English) how we expect the feature to behave.
This could be a list of specifications:
- Must not hallucinate facts
- Must preserve names, dates, numbers
- Should clearly separate “Summary” and “Action items” when possible
If you’re working with other people, or if you have users writing in with feature requests, it could be a bunch of quotes that capture how they talk about the feature:
- “I trust it not to make up details”
- “It should highlight what matters most”
- “Ideally, it tells me what I should do next”
Or it could be a bunch of failure cases that you know you have to avoid:
- Missing critical info: leaves out the main decision, dates, or numbers
- Overly long: exceeds length cap
- Too vague: generic filler (“The author discusses…”)
- Wrong emphasis: focuses on minor details, misses the key point
- Unsafe or sensitive leakage (if input contains private info)
Everyone has their own way of capturing feature specs, so I don’t want to be too prescriptive here. What matters is that you get everything down before you start building your evaluations. I recommend storing these insights in a rubric.md file. That way, anyone can add new insights to the file as they come up.
Step 2 — Convert these expectations into measurable success criteria #
Turning a jumble of expectations into measurable quantities always involves some mental gymnastics.
Here are some simple approaches to start with.
When you can turn something into a concrete number, do.
“Must be concise” => “Output < 120 words”
Specifying a range (between 100-120 words) is just as effective.
When you cannot turn something into a number, phrase the success criteria as a yes/no question.
“Must not hallucinate facts” => “Are there any new facts, names, numbers, or events not in the source material?”
You can also combine both approaches.
“It should highlight what matters most” => “Does it include the 3–5 most important points from the input?”
When phrasing your success criteria, the goal is to reduce the number of possible interpretations. The more ways a question can be interpreted, the less reliable it becomes.
“I want to be able to read this in about 30 seconds” => “Is the summary easy to scan and clear?”
The problem here is that “easy to scan” and “clear” mean a lot of different things to different people. The number of ways people could interpret this sentence is high.
That said, flaky criteria are sometimes better than no criteria. We do the best we can.
I’m going to keep this last one in as an example of what to try to avoid when possible.
Step 3 — Build a tiny “dataset” #
Create a dataset.json file and add 3 example inputs that we will use to test the prompt.
[
  {
    "input": "Hi team—We’re moving the launch from Feb 2 to Feb 9 due to QA delays. Please stop new feature merges after Jan 30. We need updated release notes by Feb 5. -Maya"
  },
  {
    "input": "In today’s call, Sales reported a 12% drop in conversion in APAC. Marketing will test a new landing page next week. Engineering suspects latency in Singapore region; investigation due Friday."
  },
  {
    "input": "All employees must complete security training by March 15. Failure to comply will lead to account restrictions. Managers should track completion weekly."
  }
]
A working dataset typically has anywhere between 10-30 examples in it. By a “working” data set, I mean we’re going to re-run the prompts with all 3 inputs every time we make a change to the prompt.
Larger data sets are expensive to run, and you will hit rate limits on your LLM API immediately. You will have larger datasets that you need to test against when you make major changes, but you won’t run them on every text change when you’re tweaking a prompt.
Also, the idea here is to build a data set over time, as you discover edge cases in your feature. Starting with 30 inputs guarantees you asking an LLM to synthetically generate all your inputs. We want to avoid this. Let’s start with 3 inputs, get our first eval running, and then we can build the data set up as we go.
Step 4 — Turn your success criteria into actual metrics #
Install Evalite and Vitest (I recommend installing the Evalite beta so we can use its built-in scorers and the ability to AB test prompts).
pnpm add -D evalite@beta vitest
Add an eval script to your package.json:
{
  "scripts": {
    "eval": "evalite"
  }
}
Create your first eval:
import { evalite } from "evalite";
import { exactMatch } from "evalite/scorers";

evalite("My Eval", {

  data: [{ input: "Hello", expected: "Hello World!" }],

  task: async (input) => {
    return input + " World!";
  },

  scorers: [
    {
      scorer: ({ output, expected }) =>
        exactMatch({ actual: output, expected }),
    },
  ],
});
Now run pnpm run eval:dev
You should see something that looks like this in your console:
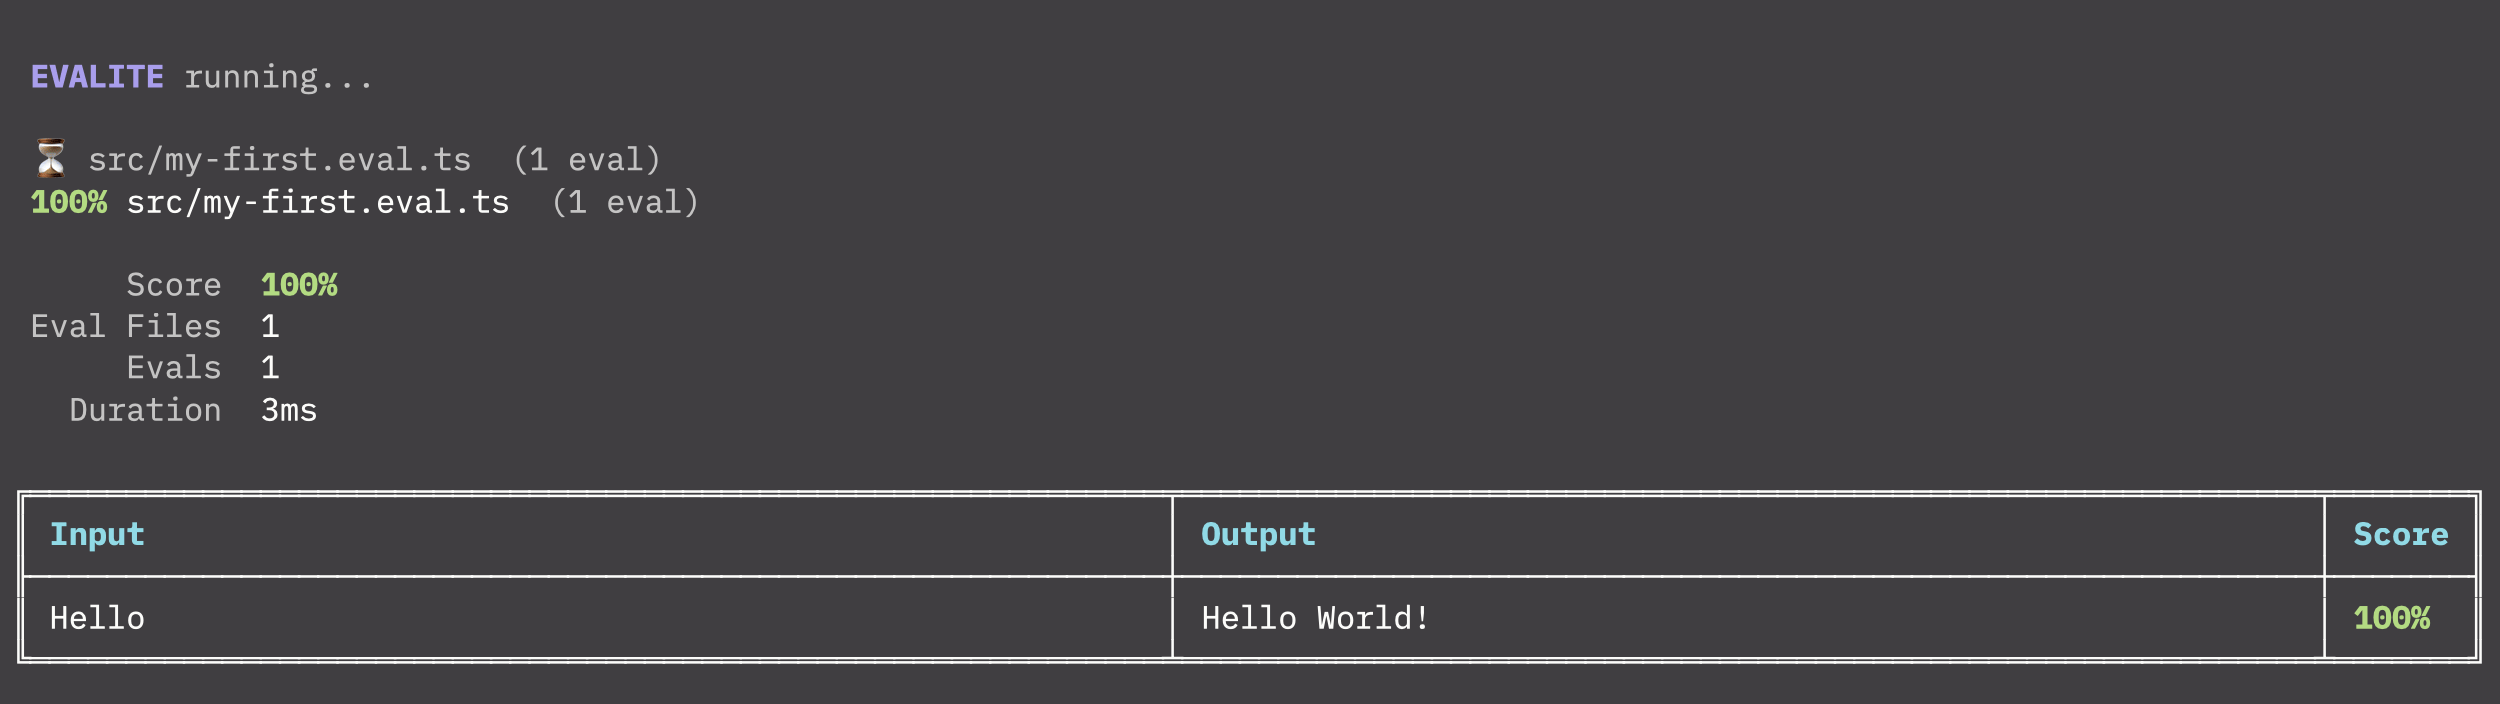
We’re going to have to change a few things about this to get it to evaluate our prompt.
First, let’s import our tiny dataset
import dataset from "./dataset.json";
and then replace
data: [{ input: "Hello", expected: "Hello World!" }],
with: data: dataset,
Now that we are feeding the right data into the evaluator, we want to replace the task without our prompt.
So…
   task: async (input) => {
     return input + " World!";
   },
needs to be replaced with:
 task: async (input) => {
    return summarize(input);
  },
Where the summarizefunction is being imported from our index.ts
import { summarize } from "./index";
Next the evaluator being used at the moment is called exactMatch . Luckily for us, the Evalite beta comes with a bunch of inbuilt scorers. The faithfulness scorer detects hallucinations, and this lines up perfectly with one of our success criteria (Are there any new facts, names, numbers, or events not in the source material?)
Let’s replace exactMatch with the faithfulness scorer:
scorers: [
    {
      name: "Faithfulness",
      description: "No new facts, names, numbers, or events not in the source",
      scorer: ({ input, output }) =>
        faithfulness({
          question: input,
          answer: output,
          groundTruth: [input],
          model: google("gemini-2.5-flash-lite"),
        }),
    },
]
This will involve importing the scorer and Google ai-sdk:
import { faithfulness } from "evalite/scorers";
import { google } from "@ai-sdk/google";
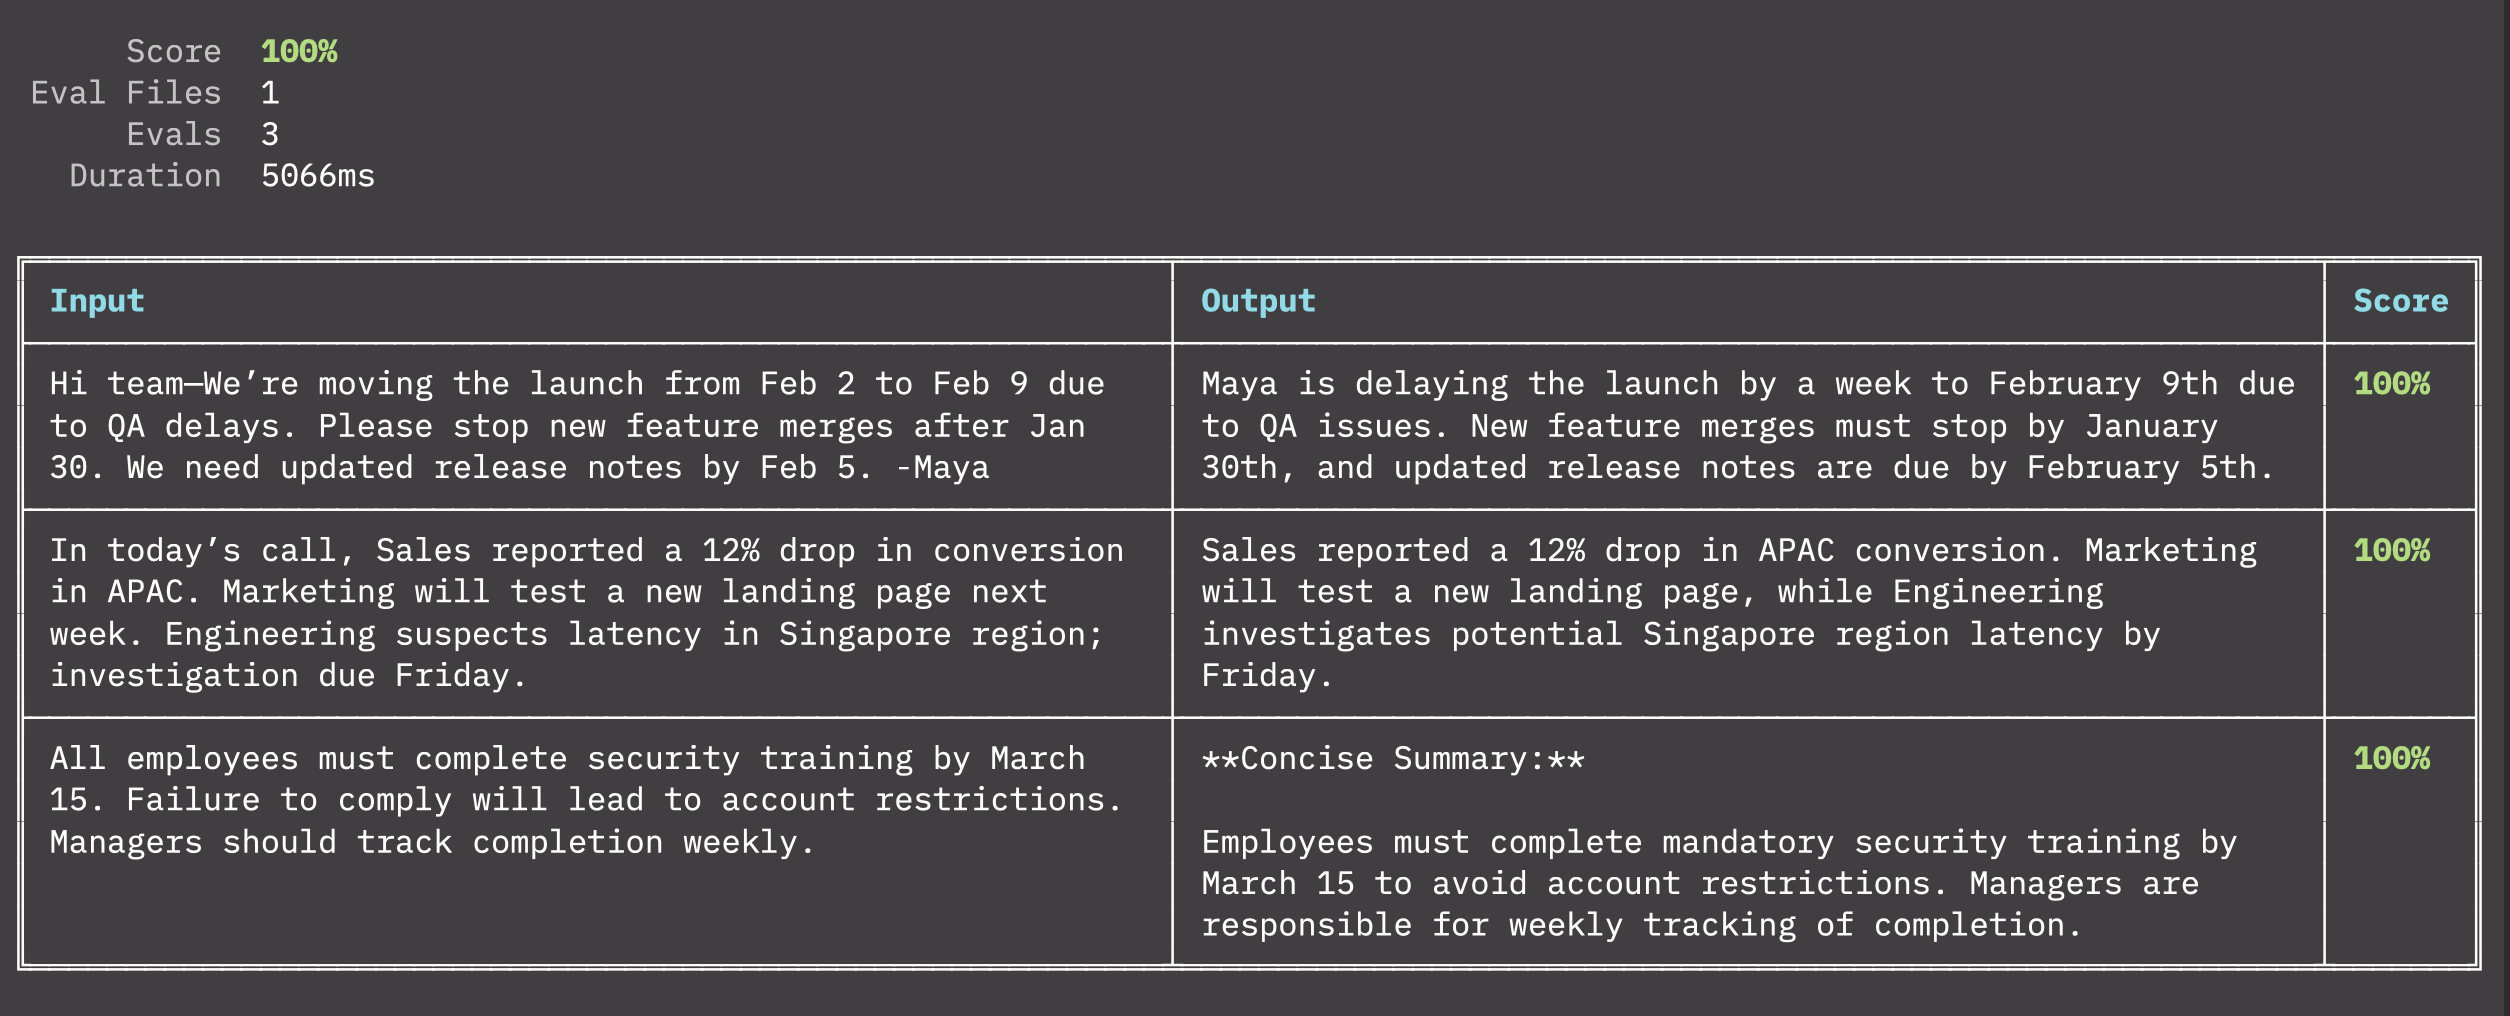
Now you can run the eval, and you should get a result that looks something like this:
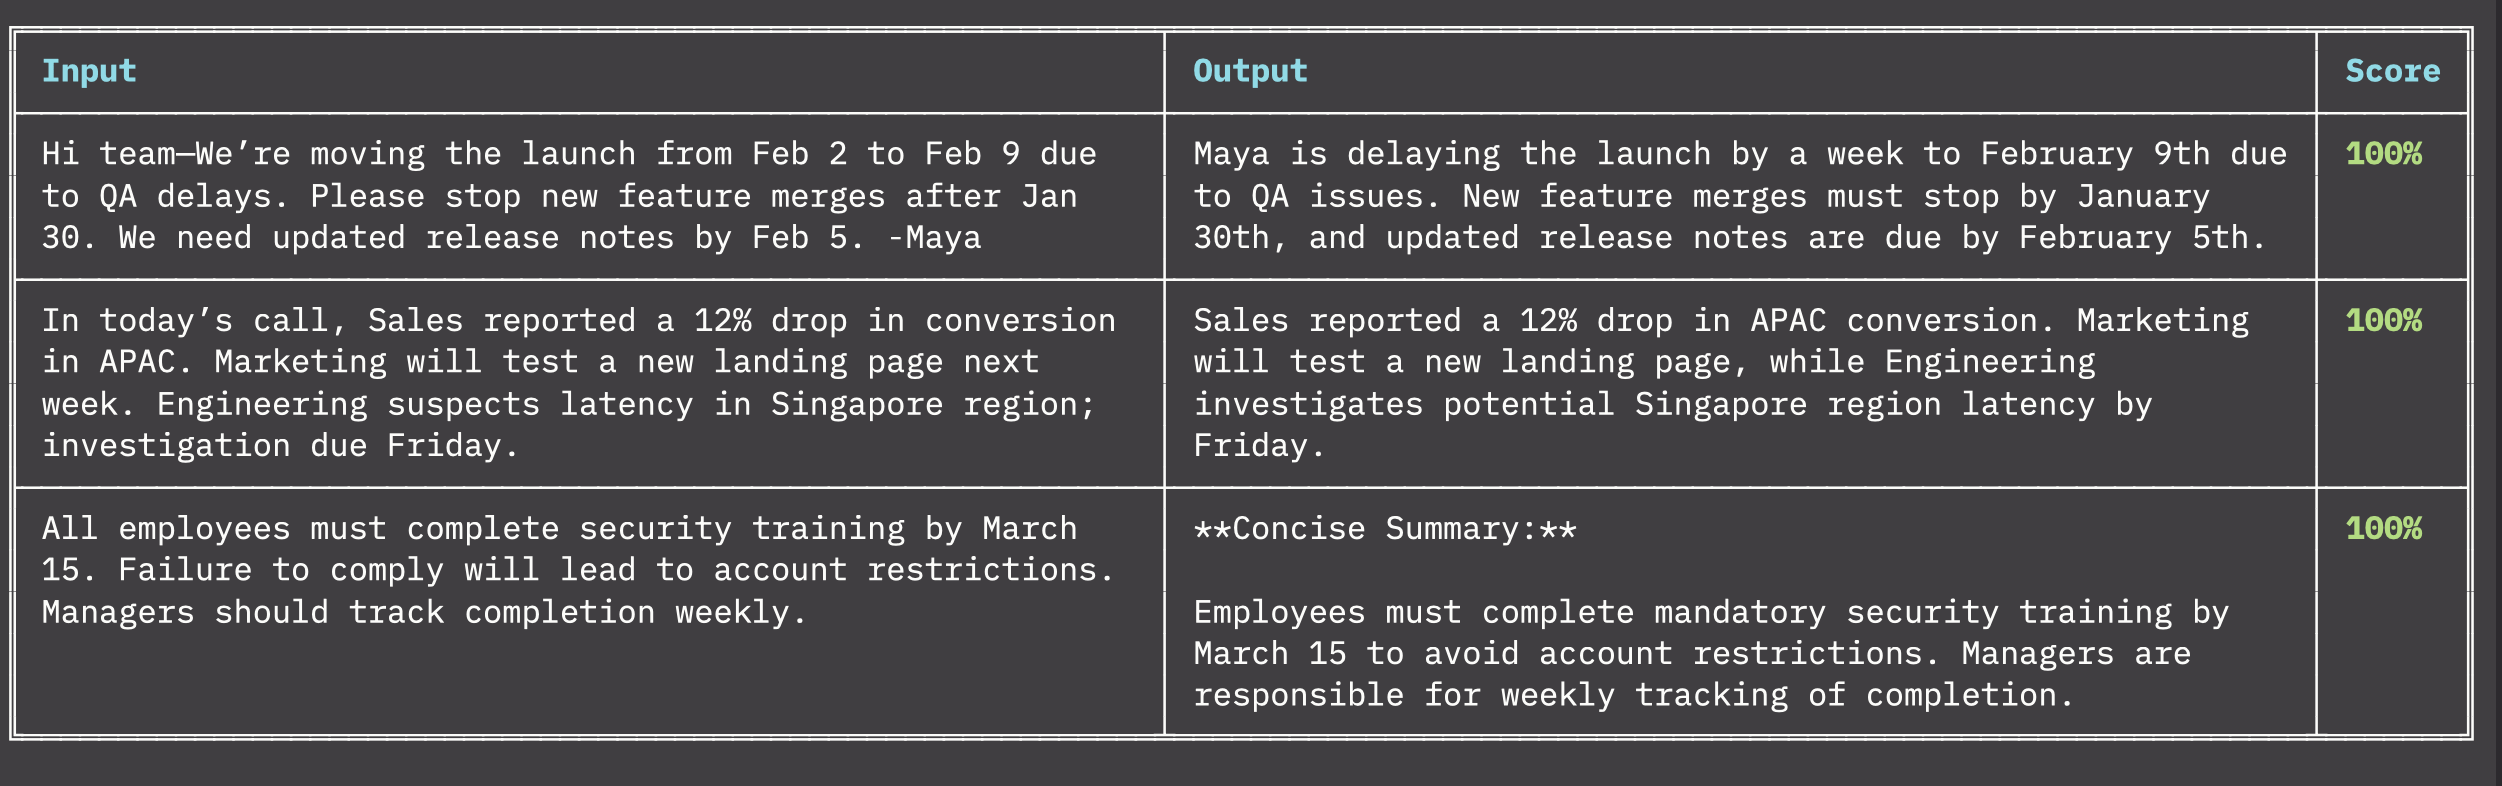
These built-in scorers are super handy, but we’re going to have to learn how to build our own if we’re going to get them to fit them to our success criteria.
Broadly speaking, there are two types of scorers: code-based and LLM-as-a-judge.
Let’s start with code-based scorers first because they are simpler:
{
      name: "Conciseness",
      description: "Output <= 120 words",
      scorer: ({ output }) => {
        return output.split(" ").length <= 120 ? 1 : 0;
      }
}
You can write good ol’ deterministic code as an inline function in the scorer and convert the output to a value between 0 and 1.
When the result is a pass/fail situation, stick to 0 and 1. When you need to represent a range or percentage, use a decimal.
Converting all outputs to a single number is important because it allows us to aggregate a bunch of scorers into a single total score for the evaluation at the end. Having a single number to work with makes it easier to keep track of improvements over time.
Code-based evaluators are just the best. They are incredibly reliable. But they are also limited. For our next success criteria (Does it include the 3–5 most important points from the input?), we could try to string match against bullet point symbols in the text and then count if there are between 3-5. But we’d still be hard-pressed to determine whether or not the bullets correspond to the most important points from the input.
This is where we get a separate LLM to assess this for us. We make the scorer asynchronous and then run a text completion call inside the scorer.
Like so…
{
name: "Coverage",
  description: "Includes the 3–5 most important points from the input",
  scorer: async ({ output, input }: { output: string; input: string }) => {
    const { text } = await generateText({
      model: google("gemini-2.5-flash-lite"),
      prompt: `Rate the output coverage from 0 to 1 based on whether it includes the 3–5 most important points from the input. Return only the score expressed as a number and nothing else :\n\n Output: ${output}\n Input: ${input}`,
    });

    const score = parseFloat(text);

    return score;
  },
Notice how I’m explicitly instructing the LLM to rate the output coverage from 0 to 1 and telling it to return only the score expressed as a number and nothing else.
You should probably switch to JSON output here and use a schema validation library to make sure you’re getting a single number back, but I’m assuming you’re already doing that so I didn’t want to make this demo more complicated than it already is.
We now have 3 scores for 3 prompts.If we run the eval script again the total comes to…100%
A 100% score is a bad sign.
You should never be able to get 100% on your aggregate score. It’s a strong indication that your scorers are not diverse enough, or that they’re not thorough enough, or that you don’t have enough test data.
In our case, it’s all three.
Let’s add our ambiguous 4th success criteria around clarity to mess everything up.
{
  name: "Clarity",
  description: "Easy to scan; clear structure",
  scorer: async ({ output }: { output: string }) => {
    const { text } = await generateText({
      model: google("gemini-2.5-flash-lite"),
      prompt: `Rate the output clarity from 0 to 1 based on how easy to scan, clear structure , bullets or short paragraphs, etc. Return only the score expressed as a number and nothing else :\n\n${output}`,
    });

    const score = parseFloat(text);

    return score;
  },
}
Now we only get 95%. Perfect.
To get a breakdown of each scorer, we can run pnpm eval serve and a dev server becomes available at http://localhost:3006
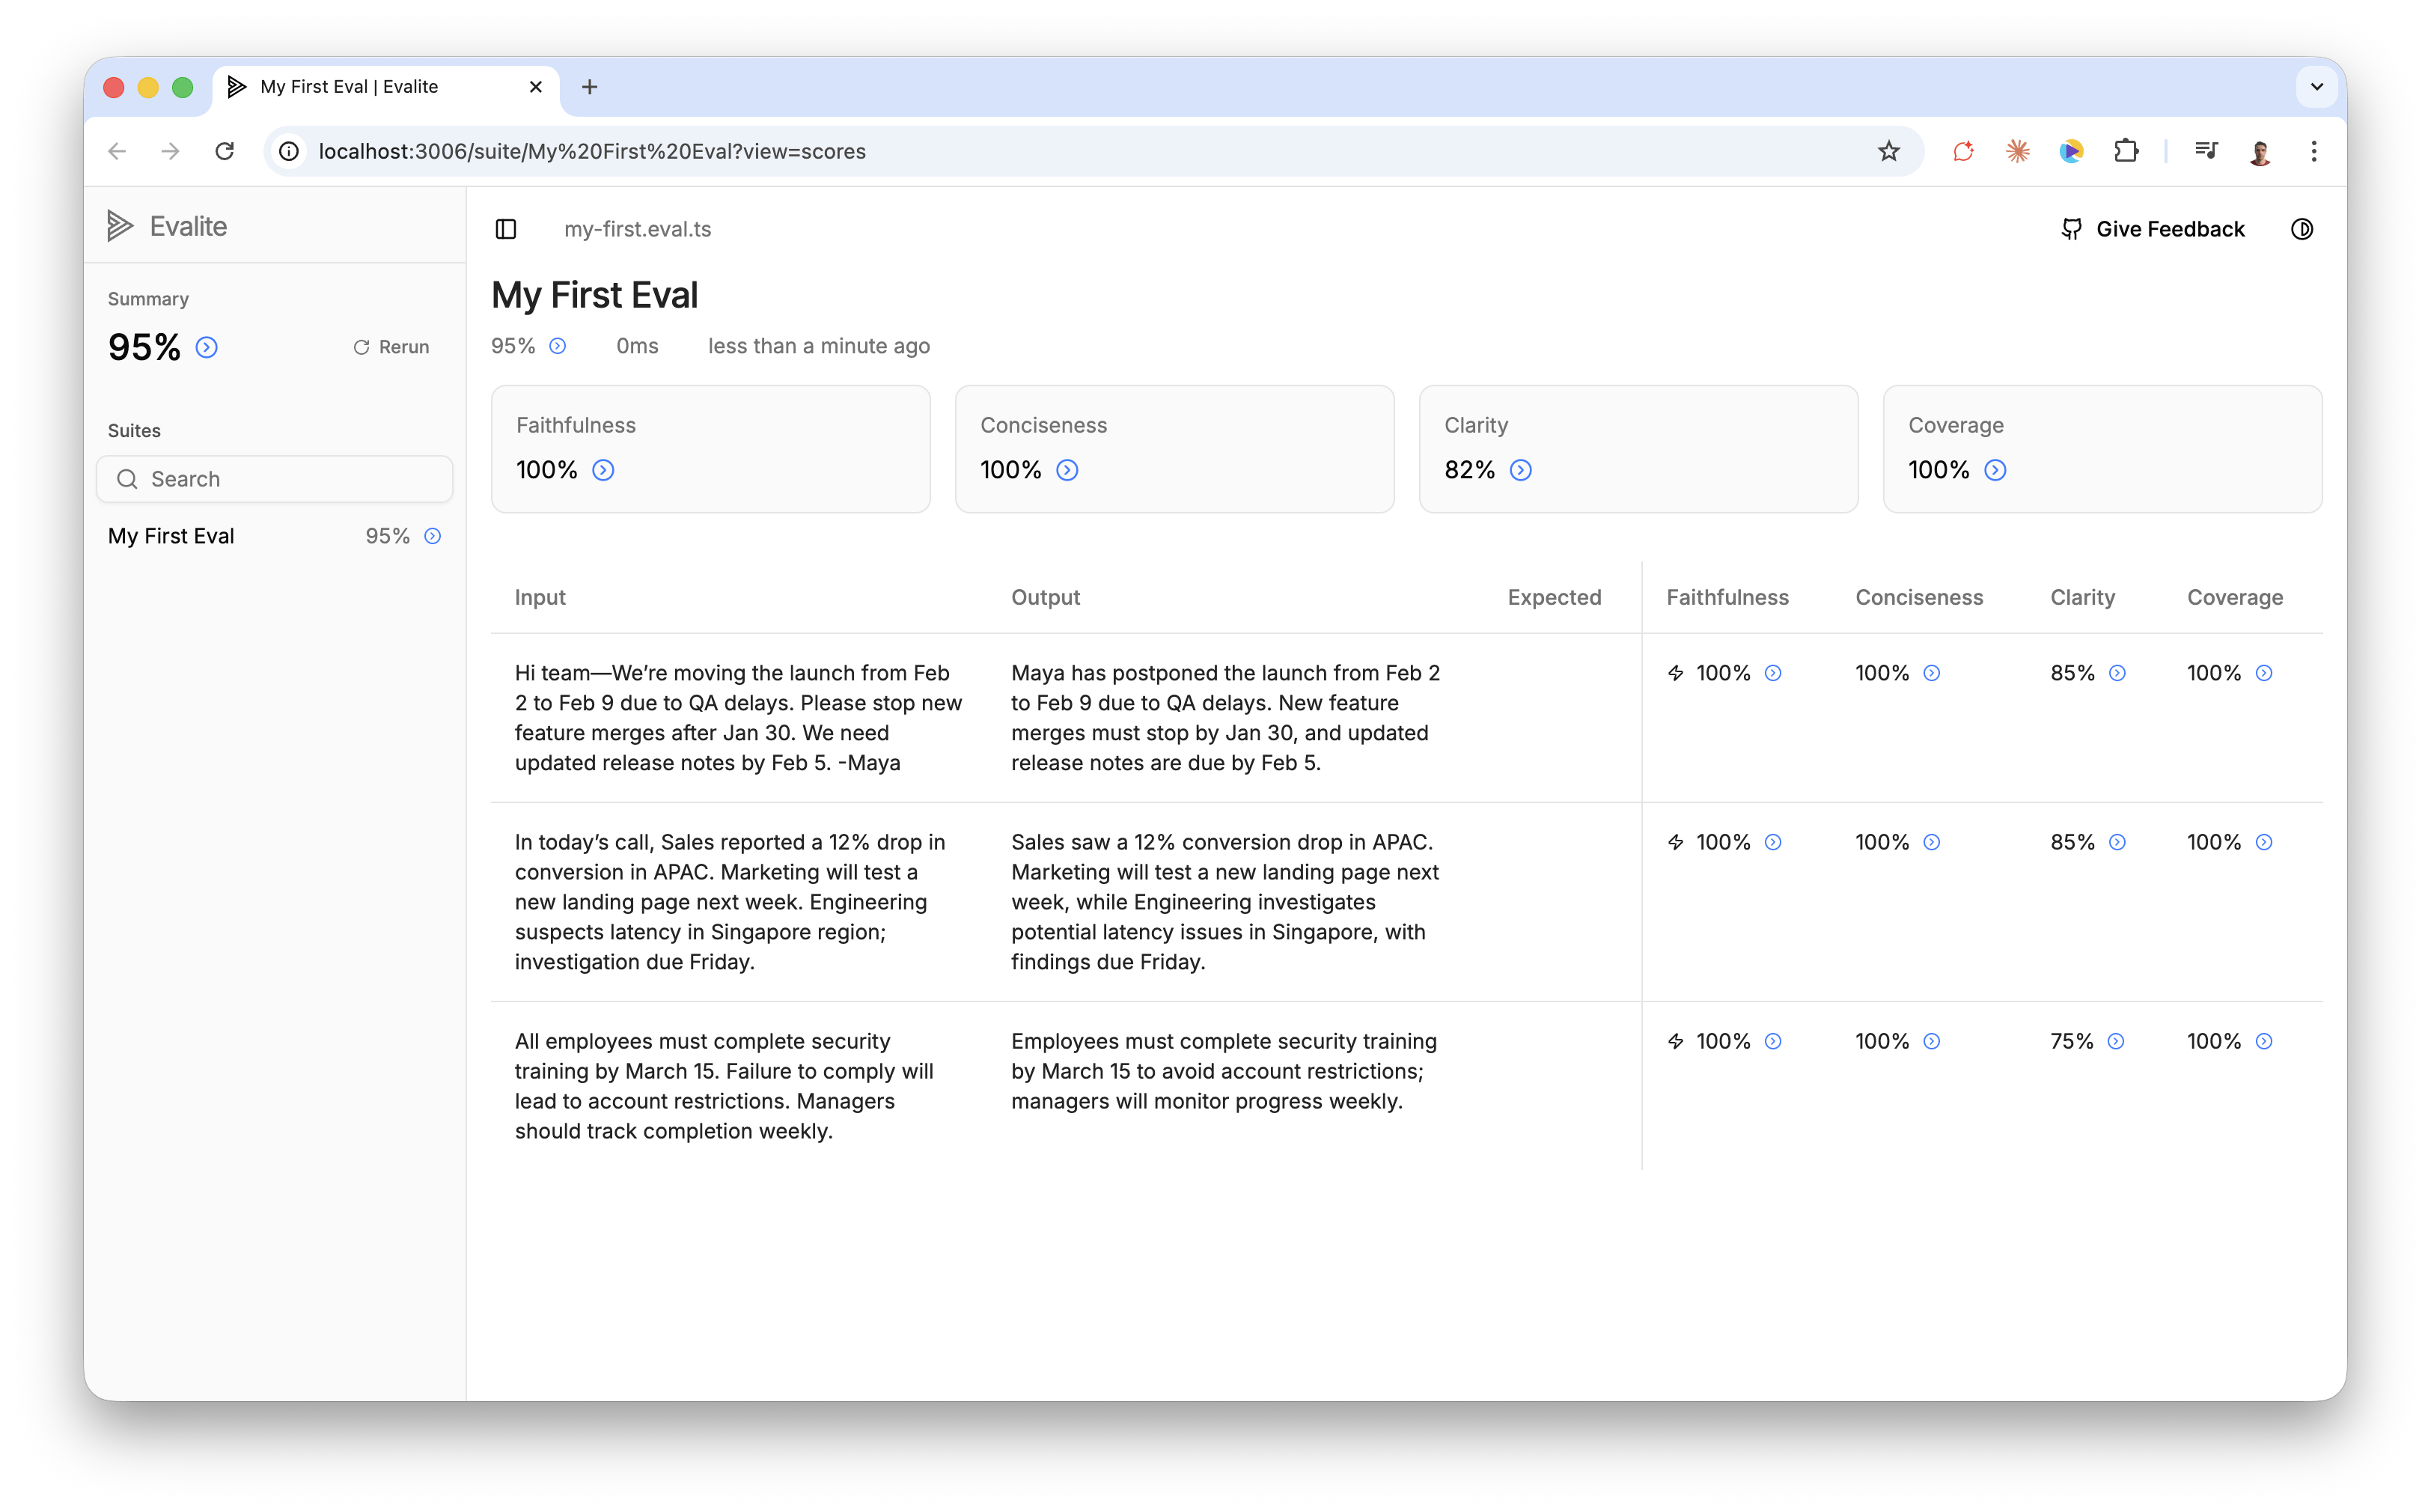
You can see Faithfulness, Conciseness and Coverage are all at 100%, but the Clarity score for each input wavers between 75% and 85%.
Our Clarity evaluator is terrible because we’ve done a poor job of defining what we mean by “clarity”, but the fact that we are only running this on 3 inputs further skews things.
Let’s add some more test data to see if we can get a more realistic average.
The way to build a good data set is to collect inputs that are especially good at breaking your prompt. The idea is to find an exception, and then improve your prompt to cover that tricky edge case. These edge cases can come from actual bug reports or from you or your team stress testing the prompt. Developing a good data set is a slow process and it’s hard work.
Right now we just need filler data so that we can base our score on more than 3 inputs.
The way I like to bootstrap test data is to go to the Claude Console and use their test case generator. This is a paid feature, so you can just ask an LLM to generate test data for you for free. I think it’s worth adding a little credit to Claude Code because they have a nifty little prompt-improver-tool that we can also use in a bit.

You will need to go to the Workbench on the left, then click on the Evaluate tab in the centre, and then you’ll see the Generate Test Case button at the bottom.
You can also grab the test inputs I generated from the dataset on the Github repo I published with the final code for this project.
If I re-run the evals with all 10 test cases, I still get 95%.
Now let’s try to fix things.
Step 5 — Getting the scores above 80% #
I’m not going to get into prompt improvement techniques here because Reddit is flooded with them. Instead, I’m going to do what I actually do when I need to beef up a prompt.
I go back to the Claude Console and I click on the Generate-a-prompt button on the Dashboard.
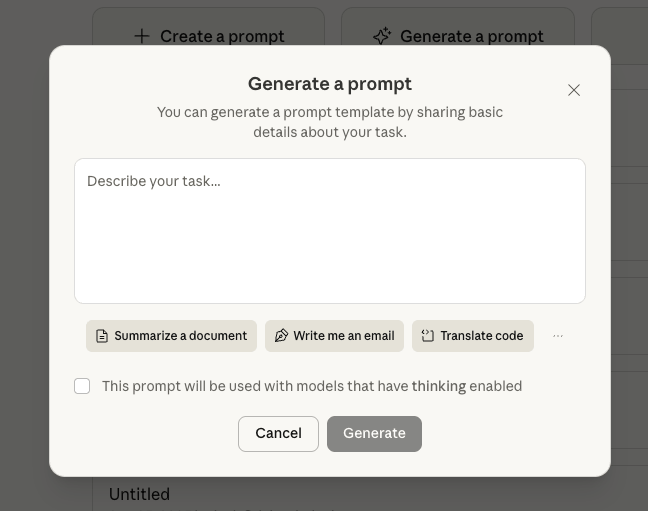
They even have a ‘Summarize’ template button, so I didn’t even have to tell it what I was trying to do, and this is what I got:
You will be summarizing a text passage. Here is the text you need to summarize:

<text>
{{TEXT}}
</text>

Please provide a concise summary of this text. Your summary should:
- Capture the main points and key information from the original text
- Be significantly shorter than the original while retaining the essential meaning
- Use clear, straightforward language
- Omit minor details, examples, and redundant information
- Be written in complete sentences

Write your summary directly as your response. Do not include any preamble or meta-commentary about the summarization task itself.
You could just replace the basic prompt we’re using in the index.ts . Since we installed the Evalite beta I want to show you how to use the new AB testing feature.
To AB test our inputs with different prompts we have to prefix the eval with a .each() method. Then each of our prompts the want to test goes into an array inside the .each() method.
evalite.each([
  {
    name: "Variant A",
    input: {
      prompt: (text: string) => `Summarize the following text concisely:\n\n${text}`,
    },
  },
  {
    name: "Variant B",
    input: {
      prompt: (text: string) => `You will be summarizing a text passage. Here is the text you need to summarize:
    <text>
    ${text}
    </text>
    Please provide a concise summary of this text. Your summary should:
    - Capture the main points and key information from the original text
    - Be significantly shorter than the original while retaining the essential meaning
    - Use clear, straightforward language
    - Omit minor details, examples, and redundant information
    - Be written in complete sentences

    Write your summary directly as your response. Do not include any preamble or meta-commentary about the summarization task itself.`,
    },
  },
])("My First Eval", {

  ...

  task: async (input, variant) => {
    const { text } = await generateText({
    model: google("gemini-2.5-flash-lite"),
    prompt: variant.prompt(input),
    });
    return text;
  },

  ...

});
The Evalite documentation only shows you how to test variants on the system prompt. I wanted to show you an example where you are passing in text to each variant.
If you’re going to use this in a real scenario, your prompt’s context is almost always going to be dynamically constructed, so it’s important to be able to pass custom data into the prompt variations you want to test. First, we turn the variant into a function so that we can use the data we pass in.
[
  {
    name: "Variant A",
    input: {
      prompt: (text: string) => `... ${text}`,
    },
  },
  ...
]
Then we swap the prompt reference out for variant.prompt(input) in the eval’s task section:
task: async (input, variant) => {

    const { text } = await generateText({
    model: google("gemini-2.5-flash-lite"),
    prompt: variant.prompt(input),
    });

    return text;
  },
If we re-run the prompt and serve the results, we can compare the two variants.
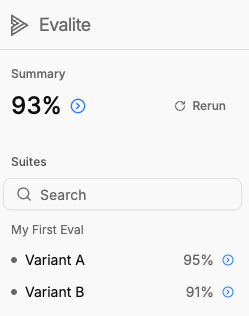
What’s interesting here is that Variant A is our super basic prompt, and Variant B is the fancy Claude Console prompt that we paid to improve.
We now have definitive data to show that our basic prompt out-performed our fancier prompt with a bunch of best practices. No vibe checks, no gut feelings, just clear evidence.
A lot of us spend ages tweaking prompts and improving things, without actually measuring the improvement in any tangible way. Writing evaluations gives us a way to define what success means for our use case and then measure against it.
This is a demo so I’ve obviously simplified things a lot, but i wante dto show you that getting some evals up and running doesn’t need to involve much more setup than writing a unit test.
I’ve pushed all the code from this demo on a Github repo so that you can run it yourself if you want to.
Something I didn’t cover is that good LLM judges need to be aligned. In our example of the ambiguous Clarity scorer, alignment would mean coming up with a data set of 100 or so examples that cover what we mean by “clear” and “not-clear” inputs. We use the data set to see how well our judge rates each example. Then we tweak the judge’s system prompt till it can accurately judge “Clarity” against the entire example data set. This is a whole process, which is why it needs to be its own post.
Till then I’ll leave you with Hamel’s excellent guide on the matter: Using LLM-as-a-Judge For Evaluation: A Complete Guide